 All-in-One COB LED TV
 Flexible LED Displays
 Transparent LED Displays
 Led Poster
 Circular LED Displays
 Column LED Screens
 Creative & Custom LED Displays
Curved LED displays have become increasingly popular in recent year. Compared with traditional flat screens, a curved LED display offers greater visual immersion, wider viewing angles, and more creative flexibility.
But what exactly is a curved LED display? And why are they becoming the go-to choice for brands, designers, and organizations craving visual impact?
What Is a Curved LED Display?

A curved LED display is a smooth curvature LED screen, either concave, convex, cylindrical, ring-shaped, or spherical. By bending the LED modules and cabinets to a certain radius, curved screens create a more natural field of view and bring a flowing, modern aesthetic.
Unlike flat panels, urved LED display can wrap around walls, columns, entrances, and even form full circles or 3D shapes. Therefore, they are suitable for creative commercial installations and architectural design.
Key Benefits of Curved LED Displays:
Curved LED displays aren’t just a design trend. They offer tangible performance and experience benefits.
More Immersive Visual Experience
It can wrap the image toward the viewer. The content feel closer and more engaging.
- Control rooms
- Gaming or simulation environments
- Large stage backgrounds
- Immersive exhibition spaces
- Wider Viewing Angle
Because the surface naturally bends toward multiple viewing positions. Audiences standing on both sides can still see accurate colors and brightness.
Seamless and Dynamic Design
Architects and designers can integrate digital media directly into the shape of a building.
More Flexible Layout Options
Thanks to flexible LED modules, designers can create:
- Rounded corners
- Circular tunnels
- Wave-shaped surfaces
- 360-degree rings
- Spherical LED globesctful ones:
Common Types of Curved LED Displays
Curved LED displays come in five main types. The key difference between them is the direction and shape of the curve,so you can choose the right one depends on your space, audience, and content goals.
Convex (Outer-Curved) LED Displays

Convex screens curve outward, bulging toward the viewer. You can think of a basketball half-submerged in a wall. This is the shape of a convex display. Their main job? To attract attention. The outward curve makes the screen stand out in busy environments, ensuring it’s visible from far away.
Best use cases:
- – Mall or airport column wraps to grab the attention of passing pedestrians)
- – Storefronts and retail windows (to showcase products or promotions)
- – Outdoor building façades (to make brand messaging visible from multiple angles)
- – Showrooms and trade show booths (to draw attendees to your display)
Pro tip:
Convex screens work best in high-traffic areas. Their outward curve ensures no one misses your content, even in crowded spaces.
Concave (Inner-Curved) LED Displays

Concave screens curve inward, like the inside of a bowl, facing the audience. Unlike convex screens , concave screens pull viewers in. Therefore, they are perfect for creating immersive environments.
Best use cases:
- – Control rooms and command centers (seamless data visualization for operators)
- – Theaters, auditoriums, and stage backgrounds (to wrap the audience in the performance)
- – Immersive experience halls (museums, planetariums, or virtual reality zones)
- – Corporate boardrooms (to make presentations feel more engaging for attendees)
Pro tip:
For concave screens, the radius matters. A tighter curve or smaller radius creates a more intense immersive effect, while a gentler curve or larger radius is better for larger audiences.
Multi-Segment Curved LED Displays

Not all curved screens need a single smooth arc. Multi-segment curved displays use multiple flat or slightly curved panels blended together to form a larger, more complex curve.
Best use cases:
- – Large stage backgrounds with multiple angles (concerts, award shows)
- – Architectural walls with irregular shapes (e.g., a “broken-line” curved wall in a hotel)
- – Budget-friendly curved installations (multi-segment is cheaper than a full smooth curve)
Pro tip:
Multi-segment screens are a great middle ground if you want a curved look without the cost of a fully custom smooth curve. Just make sure the segments are aligned properly to avoid visible “breaks” in the image.
Circular Ring LED Displays
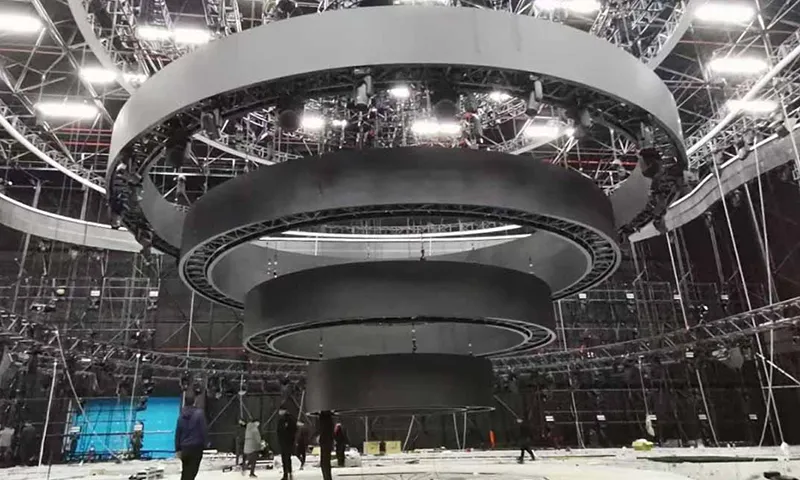
Ring-shaped or circular LED displays form a full 360-degree circle. Therefore, they are visible from every angle. They’re often hung from ceilings, embedded in walls, or wrapped around columns.
Best use cases:
- – Stadium scoreboards (to let fans on all sides see the score)
- – Exhibition hall atriums (as a focal point for announcements or art)
- – Event stages (to create a dramatic, 360-degree backdrop)
- – Transit hubs (airports, train stations) for wayfinding or advertising
Spherical LED Displays

Spherical or globe LED displays are the most eye-catching of the bunch. They form a full 3D sphere, offering 360-degree visibility from every direction. These are pure creative showstoppers.
Best use cases:
- – Science museums and planetariums (to simulate the Earth, moon, or other celestial bodies)
- – Art installations (unique, Instagrammable displays for galleries or public spaces)
- – Airports and landmark commercial centers (as a memorable brand or wayfinding element)
Pro tip: Spherical displays require flexible LED modules (more on that later) and precise engineering—they’re not cheap, but they’re guaranteed to leave a lasting impression.
Our products:
How Curved LED Screens Are Made: Hard vs. Flexible Modules
The secret to building a curved LED display lies in the modules. There are two main types of modules.You can choose between them determines what shapes you can create, how durable the screen is, and how much it costs: hard (rigid) modules and soft (flexible) modules.
Building Curved Screens with Hard LED Modules
Hard LED modules are made from rigid materials like aluminum or plastic. They can’t bend. So how do you make a curved screen with rigid panels? You rely on custom-curved frames and careful alignment.
Here’s the step-by-step process for building a concave screen with hard modules . They don’t work for convex curves, since you can’t bend them outward:
Define the arc radius:
First, you need to decide how tight the curve will be. Hard modules only work for gentle curves .The smaller the radius, the more likely the modules will crack or the image will have visible gaps.
Fabricate a custom curved frame:
A steel or aluminum frame is built to match the exact radius of the curve. This frame acts as the “backbone” for the modules.
Mount the modules:
Modules are attached to the frame either horizontally or vertically. Vertical mounting is preferred for curved screens because it creates a smoother arc transition. Horizontal mounting can leave visible gaps on tighter curves.
Limitations of hard modules:
They can only be used for concave curves , and they’re restricted to gentle arcs. If you try to force a hard module into a tight curve, you’ll end up with a bumpy, uneven screen and a distorted image.
Building Curved Screens with Flexible LED Modules
Flexible LED modules are the game-changers for curved displays. They’re made from soft, bendable materials:
- Soft PCB ,
- Silicone masks,
- Flexible wiring.
This lets them bend inward, outward, or into complex shapes like waves, cylinders, or spheres.
Here’s why flexible modules are perfect for curved screens:
- – Unlimited curvature:
- – No gaps:
- – Complex shapes:
- – Easy installation:
For example, if you want to wrap a convex curve around a mall column, you must use flexible modules. Because hard modules can’t bend outward without breaking. The same goes for spherical displays: flexible modules are the only way to create a smooth, 3D globe shape.
Flexible vs. Hard Modules: Which Offers Better Value?

Let’s compare them side by side to help you decide:
Durability & Longevity
Hard modules win here. Their rigid materials are more resistant to damage, UV light, and extreme temperatures. They’re also less likely to degrade over time. The hard modules can last 8–10 years with minimal maintenance.
However, Flexible modules use soft materials that can degrade over time. Exposure to UV light for outdoor screens or repeated bending can weaken the PCB or silicone, affecting color consistency or bending capability. They still last 5–7 years , but they’re not as durable as hard modules for long-term, harsh environments.
Safety
Hard modules have stronger structural support, so they’re less likely to deform or have electrical issues from physical stress.
However,Flexible modules are safe when installed correctly, but they require more careful handling during installation to avoid damaging the soft circuits.
Cost
Flexible modules are significantly more expensive. It often 30–50% pricier than hard modules, especially for fine pixel pitches ,like below P2 or smaller.
Hard modules are ideal for large, flat or gently curved screens .
Best Use Cases Recap
Choose flexible modules if:
- – You need creative shapes (convex curves, rings, spheres, waves)
- – You want a smooth, seamless curve with no gaps
- – The project is a temporary or semi-permanent installation (e.g., event stages, pop-up exhibitions)
Choose hard modules if:
- – You need a flat or gently concave screen
- – Durability and long-term reliability are key (e.g., outdoor façades, control rooms)
- – You’re working with a tight budget
On-Site Measurement: The Key to a Perfect Curved LED Display
A curved LED display is only as good as its measurements. You should get the radius, arc length, or chord length wrong, and you’ll end up with a screen that doesn’t fit the space. It has a distorted image, or gaps between modules. To avoid costly mistakes, here are the critical measurements you need to take on-site.
Critical Measurements to Take
1. Radius (r): The Most Important Measurement
The radius is the distance from the center of the imaginary circle the curve follows to any point on the screen’s surface. It’s the foundation of your curved screen design.
How to measure it:
– Method A (Center is visible): If you can easily find the center of the circle , use a tape measure to measure from the center to the screen’s surface. That’s your radius.
– Method B (Center is hidden): This is the most common scenario . Here’s how to do it:
- 1. Pick three points on the curved surface (A, B, C) that are evenly spaced.
- 2. Draw straight lines (chords) connecting A to B and B to C.
- 3. Find the midpoint of each chord, then draw a perpendicular line (bisector) through each midpoint.
- 4. The two bisectors will intersect at the center of the circle.
- 5. Measure from this center point to any of the three original points (A, B, or C)—that’s your radius.
2. Arc Length (L)
The arc length is the total length of the curved surface where the screen will be installed. This tells you how many modules you need horizontally.
How to measure it:
You can Use a soft tape measure and follow the curve closely. For long arcs, measure in sections and add them together. Avoid using a rigid tape measure. You’ll get an inaccurate, shorter length.
3. Chord Length (a)
The chord length is the straight-line distance between the two endpoints of the arc. Think of it as the “flat” length of the curve.
How to measure it:
You can Use a laser distance meter or a rigid tape measure to measure the straight line between the two ends of the curve.
4. Height (H)
The height is the vertical dimension of the screen . This tells you how many modules you need vertically.
How to measure it:
You can Use a tape measure or laser distance meter to measure the vertical space where the screen will be installed.
Key Formulas for Curved Screen Calculations
Once you have these measurements, you’ll need to use a few simple formulas to calculate the number of modules:
Arc Length from Radius and Central Angle
If you know the radius (r) and the central angle (θ, in degrees. The angle at the center of the circle between the two endpoints of the arc), you can calculate the arc length (L):
L = (θ / 360°) × 2πr
Example: If the radius is 5 meters and the central angle is 90°, L = (90 / 360) × 2 × 3.14 × 5 = 7.85 meters.
Central Angle from Chord Length and Radius
If you know the chord length (a) and radius (r), you can find the central angle (θ):
θ = 2 × arcsin(a / (2r))
Example: If the chord length is 6 meters and the radius is 5 meters, θ = 2 × arcsin(6 / (2×5)) = 2 × arcsin(0.6) ≈ 73.74 degrees.
Number of LED Modules
Once you have the arc length (L) and height (H), you can calculate how many modules you need:
– Horizontal modules = Arc length (L) ÷ Module width (e.g., if the arc length is 7.85m and modules are 0.5m wide, you need 16 modules horizontally)
– Vertical modules = Screen height (H) ÷ Module height (e.g., if the height is 3m and modules are 0.5m tall, you need 6 modules vertically)
– Total modules = Horizontal modules × Vertical modules (16 × 6 = 96 modules total)
Pro tip:
Add a small allowance (1–2%) for gaps between modules and frame tolerances. It’s better to have a few extra modules than to run short.
Final Thoughts:
Curved LED displays aren’t just a passing trend. They’re redefining how we interact with digital content. Whether you’re wrapping a convex curve around a mall column,, curved LED technology offers endless possibilities.
The key to success? You need to choose the right modules for your project, and taking accurate on-site measurements. And if you’re planning your own curved display project? Cotact us today know more details.