All-in-One COB LED TV
 Flexible LED Displays
 Transparent LED Displays
 Led Poster
 Circular LED Displays
 Column LED Screens
 Creative & Custom LED Displays
Most integrators ask the wrong question: “Which type should I buy?” The answer isn’t in the product catalogue. It’s in your wall. A front service LED display and a rear-access installation solve the same problem — your space makes the call. Based on 300+ indoor LED display projects across 55 countries.
- → Fixed wall, no rear clearance
- → Chain retail, coffee shops, corporate lobbies
- → Front-of-screen maintenance is acceptable
- → COB P1.2–P2.5 typical pitch
- → Concrete or brick wall
- → New freestanding structure can be built
- → ≥600mm rear corridor is feasible
- → Mall or public venue — can’t stop operations
- → Outdoor or flush with building façade
- → Local welding crew available
- → 90° corners, curves, column wraps
- → Geometry drives the structure first
- → Manufacturer provides drawings free
- → Local crew builds on-site
Two Methods. One Job.
Maintenance on an LED wall means one thing: swapping a failed module for a spare. Not repairing chips. Not pulling cables. A module goes bad, a technician replaces it, done.
The difference between front service and rear access is simply which direction the technician works from.
Front service LED display — how it actually works
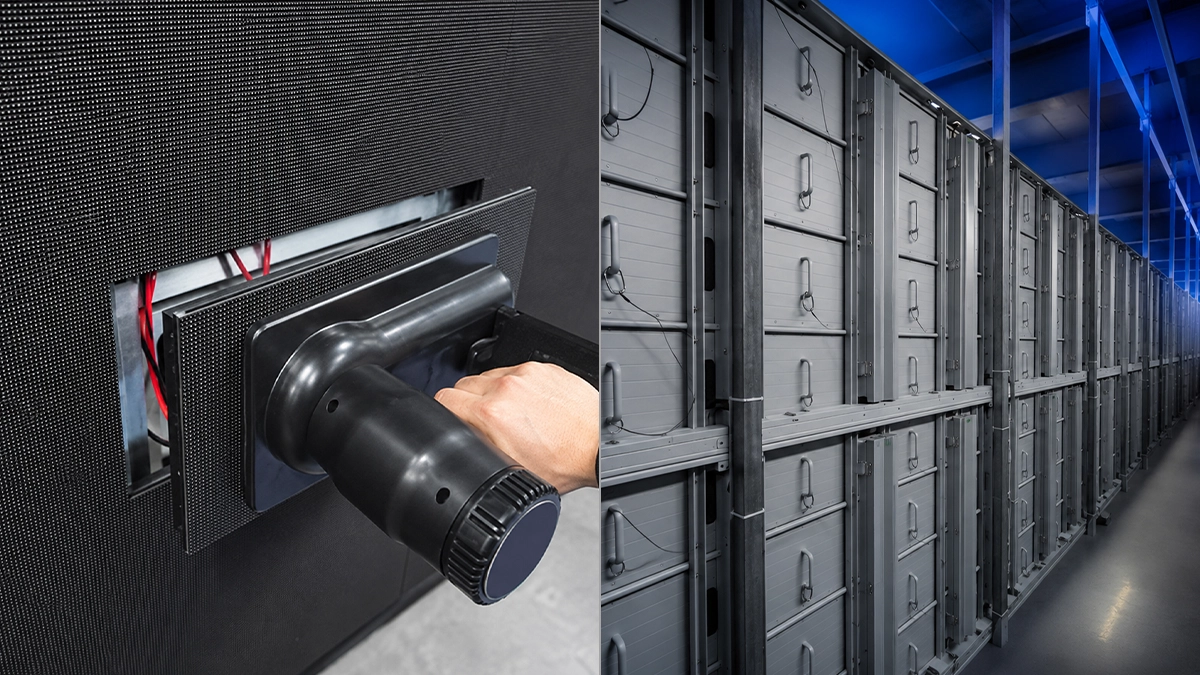
The module pulls off the face of the cabinet. Three retention methods are in common use: magnetic hold, mechanical clips, and front-facing screws. One motion to detach, one motion to seat the replacement. The cabinet stays bolted to the wall the whole time. Nothing behind the screen gets touched.
- The cabinet rear panel is completely sealed — no rear door exists
- The cabinet itself never comes off the wall under normal maintenance
- Cabinets hang on a steel back-rail: protruding bolts slot into machined channels in the rail, flush to the wall surface
- Cabinet weight runs approximately 20 kg/m² — standard concrete and brick walls handle this without reinforcement
Rear-access LED wall — how it actually works
A service corridor sits behind the wall — 600–800mm deep, enough for one person to stand and work with both hands. Each cabinet has a rear door. Open it, reach in, swap the module, power supply, or control card. The screen face never gets touched.
This is the go-to approach for malls, airports, hotel lobbies — anywhere that can’t have a technician visibly working at the screen face during operating hours.
LED maintenance on-site is module replacement — not chip-level repair. Nobody is soldering anything in the field. A failed module gets swapped for a spare from the same production batch, then sent back to the workshop. At DOIT VISION’s production standard for COB P1.2, a 100m² installation typically needs 2–3 module replacements over its full service life. Usually a driver IC or a power supply — not the LED chips themselves.
Cabinets built for both front and rear access do exist. They cost significantly more. We specify them rarely — only when an installation genuinely needs both sides accessible. For standard projects, pick one and build the structure around it.
Your Wall Decides. Not the Product Catalogue.
Integrators usually frame this as a product decision. It isn’t.
Every LED manufacturer — including DOIT VISION — makes both configurations as standard. The constraint is always the site. What’s the wall made of? Is there space behind it? Can a technician work at the face during business hours?
Answer those questions first. The product spec follows.
There’s a second misconception worth killing: that front or rear access is a fixed property of the product itself. In most cases, the cabinet supports rear access by default — front service is a function of the mounting rail and cabinet configuration. You’re not choosing a product type. You’re choosing a structure.
We configure both front and rear access for any indoor LED display project, as standard. Once a client confirms the site constraints, we provide cabinet drawings, mounting rail specs, and full structure schematics — at no charge. The structure gets built by the local contractor. We give them everything they need to do it right.
Find Your Site. Then Find Your Answer.
Four scenarios. Most projects fall into one of them.
Scenario A — Fixed Wall, No Rear Space
Where you see this: chain retail, coffee shop counters, hotel lobbies, corporate reception walls. Any installation against a wall that isn’t moving.
Steel back-rail goes straight onto the wall surface. Cabinets hang flush — no gap visible. Modules come off the front. Standard concrete and masonry carry the load (≈20 kg/m²) without any reinforcement.

A well-known Georgian coffee chain rolled out front service COB P1.2 displays across roughly 40 locations. Each screen: 5×1m or 4×1m, mounted above the counter so customers could read the menu clearly while ordering. COB P1.2 for the pixel density at under 2m viewing range. Back-rail flush-mount at every location. No rear space available — or needed.
Scenario B — New Structure Can Be Built, Rear Corridor Is Viable
Where you see this: mall atriums, planned commercial buildings, transit terminals. Anywhere a freestanding LED structure can go up independently of the existing wall.
Local contractor builds a welded steel frame from DOIT VISION’s structural drawings. Frame creates a maintenance corridor ≥600mm at the rear — room for one person to stand, turn, and work with both hands. All cabling, power supplies, and control cards route through the rear. Nothing at the screen face.
Structure cost, real numbers:
- China: approximately ¥600–1,500/m² of display area
- Europe / North America: typically 2× that
For a 10m² installation: ¥6,000–15,000 in China; roughly USD $1,700–4,200 in Western markets. On large-format displays, the structure cost can equal or exceed the panel cost. Quote the total, not just the screen.

We’ve seen bolted frames proposed as a cost-saving alternative. They don’t hold tolerance. The precision required for seamless LED panel alignment can’t be maintained through bolted connections under load — gaps open up over time, and tiling becomes visible. Welded frames only. DOIT VISION provides complete fabrication drawings at no charge so the local contractor has no excuse for cutting corners.
Scenario C — Special Geometry: Corners, Curves, Columns
Where you see this: immersive showrooms, 90° corner joins, curved feature walls, column wraps.
Here the structure gets engineered for the display geometry first. Access method is secondary — it follows from whatever the structure requires. A gap between screen and wall is often necessary for alignment at joins and curves, regardless of whether anyone is thinking about maintenance.

A US video production company wanted COB P0.9 with a seamless 90° corner join — immersive showroom, close viewing range. To get the corner geometry right, they fabricated a lightweight custom frame that held each panel roughly 200mm off the wall. That offset had nothing to do with maintenance. It was structurally necessary for the join. Front access came as a natural result of the frame design.
Scenario D — Outdoor or Flush with Building Façade
Where you see this: building-integrated outdoor LED, rooftop displays, façade screens sitting flush with the exterior.
When the screen face aligns with the building exterior, front access is physically impossible. Standard outdoor cabinets with rear-opening service doors. The structural frame runs floor-to-ceiling — load goes to the floor, not the façade.

Korean client, P6 outdoor LED at rooftop level, screen face flush with the building façade. Front maintenance: not an option. Standard rear-service outdoor cabinets in a floor-to-ceiling welded frame, built to local wind load specs. DOIT VISION provided the structural drawings; a Korean contractor built the frame. All maintenance happens from the rear corridor. Building exterior: untouched.